Food QnA Chatbot : Help Answer Food Related Questions from Your Own Cookbook
Introduction
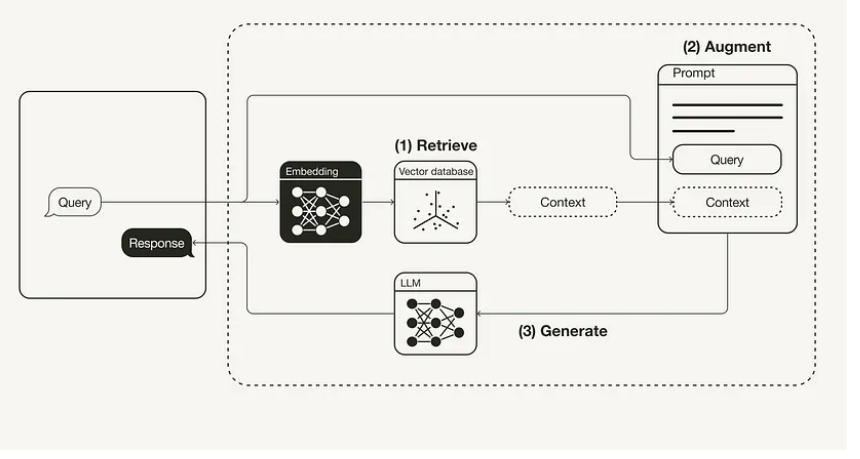
Retrieval Augmented Generation (RAG) is a powerful technique that allows you to enhance your prompts by retrieving data from external sources and incorporating it into the context. The external data used for augmentation can be gathered from diverse sources such as document repositories, databases, or web search results.
To begin with RAG, you need to convert your documents and user queries into a compatible format to perform relevancy search. This involves converting both the document collection, or knowledge base, and user-submitted queries into numerical representations using embedding. Embedding is a process that assigns numerical values to text, placing them in a vector space.
RAG model architectures then compare the embeddings of user queries with those “vector index” of the knowledge base. By doing so, they identify similar documents in the knowledge base that are relevant to the user’s prompt. These relevant contents from similar documents are appended to the original user prompt.
Finally, the augmented prompt, which now includes the relevant retrieved content, is passed on to the foundation model to generate the final responses. This integration of retrieval and generation significantly improves the quality and relevance of the model’s outputs. Below is an illustrative diagram that demonstrates the overall RAG (Retrieval Augmented Generation) process.  .
.
An Example Project for RAG
I have created an example project to provide a practical demonstration of how RAG works. For more detailed information and insights into the project, you can find comprehensive documentation and additional resources on 
Set Up Local Virtual Environment
- Step 1: Install Miniconda on MacOS, see instruction here.
- Step 2: Create a default conda env with Python 3.9:
conda create --name food_qna_app python=3.9 -y - Step 3: Activate the conda env created above:
conda activate food_qna_app - Step 4: Install first set of required libraries in the conda env:
pip3 install -r requirements.txt - Step 5: Deactivate the conda env when you are done (note: you need activate this virtual env to work on the app)
conda deactivateSet Up Open AI Secrete for Local Dev
OPENAI_API_KEYwill be needed when calling the OpenAI API endpoint for generating embeddings for the documents, so do recommend exportingOPENAI_API_KEYas an enviroment variable on your local dev machine; also, we will need create asecrets.tomlfile and add theOPENAI_API_KEYthere, so the streamlit app can pick up the API key when send requests to OpenAI endpoint during runtime. - Step 1: Export
OPENAI_API_KEYas an enviroment variable on your local dev machine - Step 2: Create
.streamlitdirectory under the root repocd food_qna_chatbot_demo mkdir .streamlit - Step 3: Create
secrets.tomlfile under.streamlitdirectory and add yourOPENAI_API_KEYthereOPENAI_API_KEY=<YOUR_OPENAI_API_KEY_HERE> - Step 4: To reduce the risk of accidentally committing your secrets to your repo, add
.streamlitto your.gitignorefile.echo ".streamlit/" >> .gitignoreSet up the Redis Database on your local dev machine
- Step 1: Install Docker Desktop on Mac, and start the docker desktop.
- Step 2: We’re going to use Redis as our database for both document contents and the vector embeddings. You will need the full Redis Stack to enable use of Redisearch, which is the module that allows semantic search - more detail is in the docs for Redis Stack. Run the following command in your terminal to start the docker container:
docker run -d --name redis-stack -p 127.0.0.1:6379:6379 -p 8001:8001 redis/redis-stack:latest - Step 3: Initiate a Redis connection and create a Hierarchical Navigable Small World (HNSW) index for semantic search using a recipe book which can be found under the directory
cook_book_datapython build_knowledge_base.pyIf the recipe book is indexed succefully into the DB, you should expect the following info printed out in the console:
===
Number of documents indexed in the DB: 144
Run the APP
In your terminal, run the App by
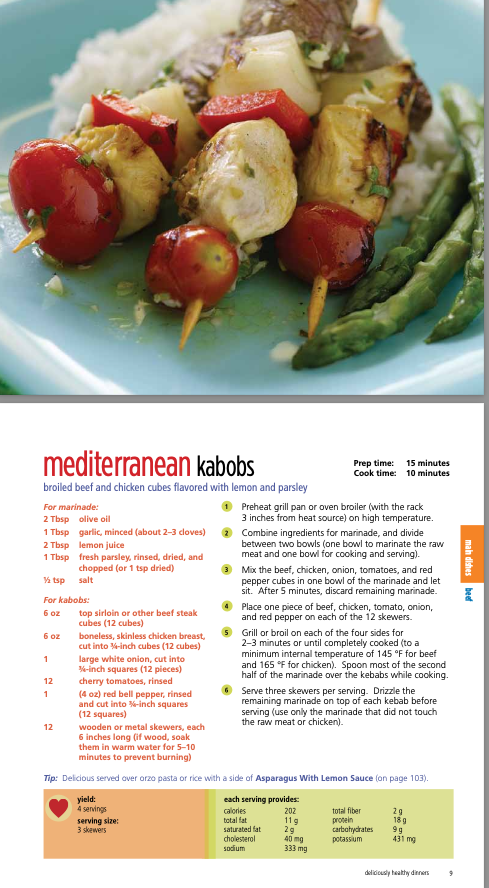
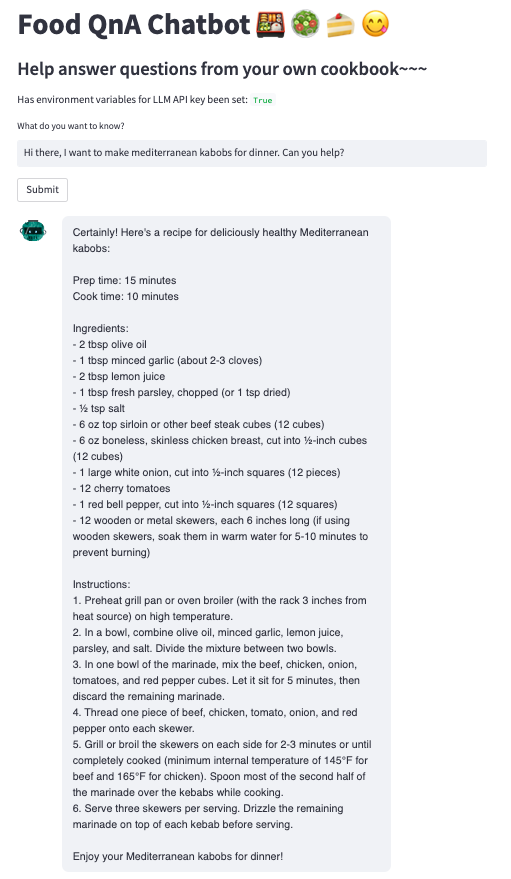
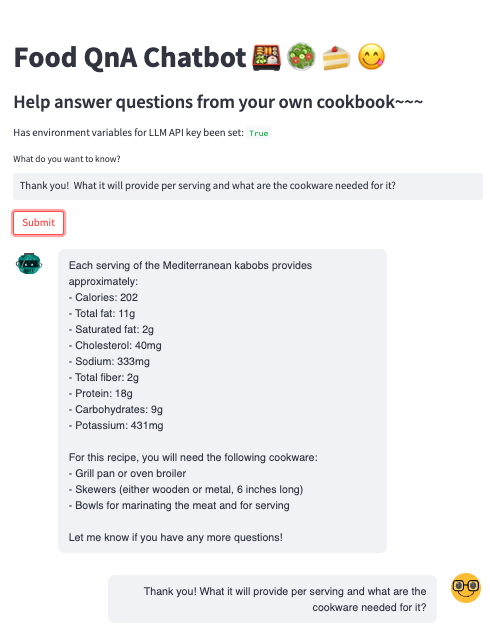
streamlit run food_qna_app.pyYou can start asking questions related to food preparation and cooking, and also some follow up questions. See screenshot below.
| Original Content | Chat History - first turn | Chat History - follow up |
|---|---|---|
 |
 |
 |